Vinyl flooring is a popular choice for homeowners and businesses due to its durability, affordability, and variety of styles. However, it can suffer damage over time, leading to scratches, dents, or tears. This article provides a comprehensive guide to vinyl flooring, covering types available, effective repair techniques, and preventive strategies to maintain its appearance and longevity.
In addition to outlining the repair process, the guide offers valuable tips and considerations to enhance your repair efforts, such as understanding different vinyl types and using the appropriate adhesives and tools. With this information, you can help keep your vinyl flooring in excellent condition for years to come.
How to Repair Vinyl Flooring
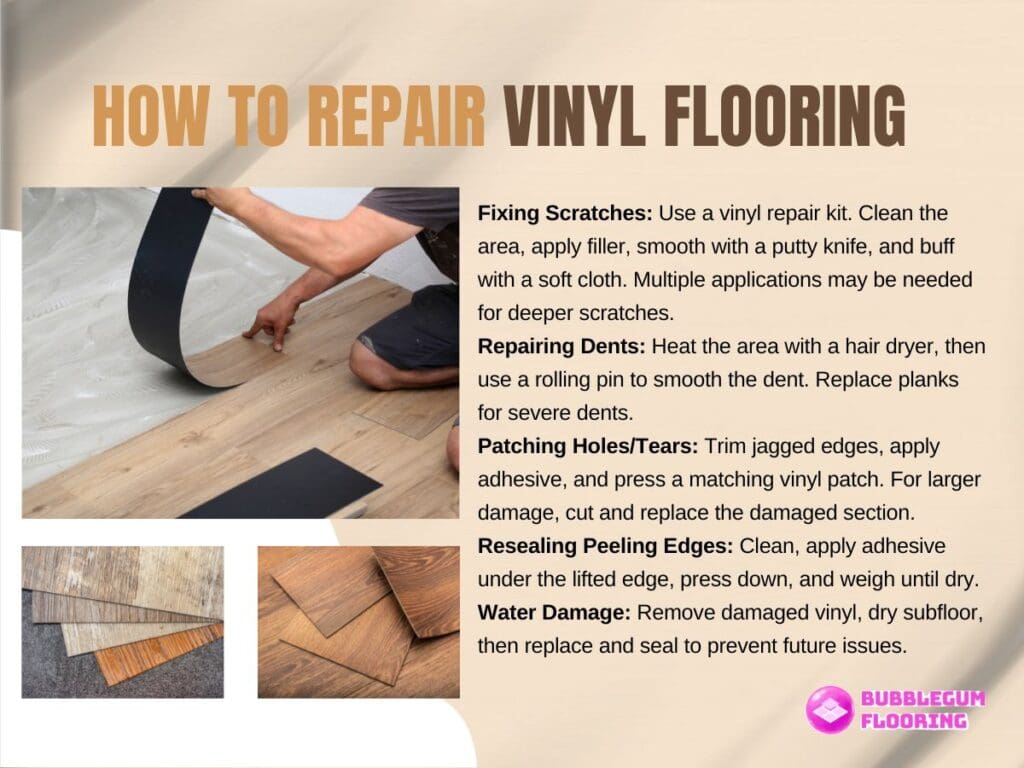
Vinyl flooring is durable and low-maintenance, but over time, it may develop issues such as scratches, dents, or water damage. Knowing how to repair these common problems can help prolong the life of your floor and maintain its appearance.

- Fixing Scratches
Minor scratches on vinyl flooring can often be repaired using a vinyl floor repair kit, which typically includes a filler compound and a clear finish. Start by cleaning the area to remove any dirt or debris, then apply the compound to the scratch and smooth it out with a putty knife. After the compound has dried, buff the area with a soft cloth to blend the repair with the surrounding surface, restoring the floor’s original finish. For deeper scratches, multiple applications of filler may be necessary.
- Repairing Dents
Small dents in vinyl flooring, often caused by heavy furniture or appliances, can be fixed by applying heat to the area using a heat gun or hair dryer. Heat softens the vinyl, allowing you to carefully push the dent back into shape using a rolling pin or similar tool. For more severe indentations, where the material has been compressed beyond repair, replacing the damaged tile or plank is usually the best option. Be sure to place furniture pads under heavy items to prevent future dents.
- Patching a Hole or Tear
Holes or tears in vinyl flooring require patching to prevent the damage from spreading. For small tears, a vinyl patch kit with adhesive and a matching patch can be used. First, trim any jagged edges around the hole, then apply the adhesive and firmly press the patch into place. If the damage is extensive, you may need to cut out the damaged section and replace it with a new piece of vinyl, making sure the replacement matches the existing pattern and color. Seal the edges with adhesive to ensure a seamless finish.
- Resealing Peeling Edges
Peeling or curling edges are often the result of improper installation or moisture issues. To fix this, first, clean the affected area to remove any dust or grime that might interfere with the adhesive. Apply a vinyl adhesive underneath the lifted edge, press the vinyl back into place, and use a heavy object (like a book or brick) to weigh it down while the glue sets. This helps to ensure that the bond is strong and the edge lays flat. Regular maintenance and addressing moisture sources can prevent this problem from recurring.
- Dealing with Water Damage
Even though vinyl is water-resistant, water can sometimes seep under the flooring, causing it to lift or bubble. To repair water damage, first remove the damaged section of the vinyl and dry the subfloor completely. You may need to use a dehumidifier or fan to ensure no moisture remains, as laying vinyl on a wet subfloor will only lead to further issues. Once dry, replace the damaged section with new vinyl, making sure it is securely adhered to and sealed to prevent future water infiltration.
Many vinyl flooring issues, such as scratches, dents, peeling, and water damage, can be effectively repaired with the right tools and techniques. Addressing these problems promptly will not only restore the floor’s appearance but also protect it from further damage, ensuring its longevity.
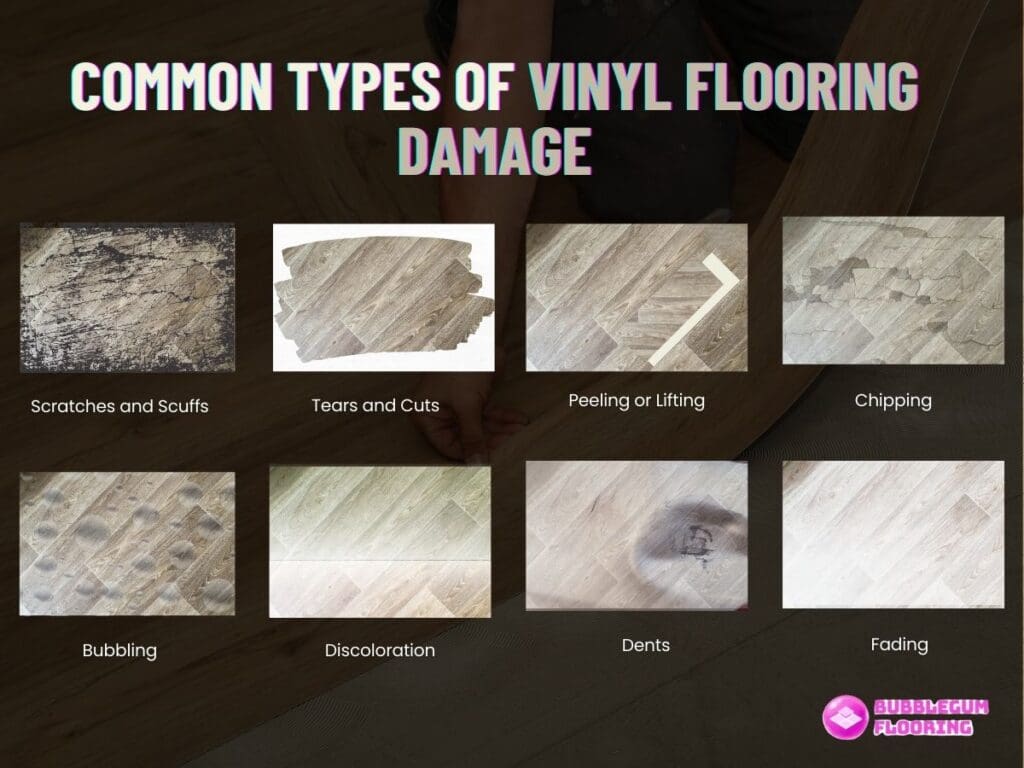
Common Types of Vinyl Flooring Damage
Vinyl flooring is a popular choice for many homeowners due to its durability, affordability, and ease of maintenance. However, despite its resilience, vinyl flooring is still susceptible to various types of damage.

- Scratches and Scuffs: Damage often results from heavy furniture, pet claws, or sharp objects dragging across the surface.
- Tears and Cuts: Sharp objects or accidental impacts can lead to rips in the vinyl.
- Peeling or Lifting: Improper installation or moisture intrusion can cause the edges of the flooring to lift.
- Bubbling: Trapped moisture or poor adhesion may result in raised blisters on the vinyl surface.
- Discoloration: Exposure to sunlight, spills, or harsh cleaning products can lead to uneven patches of color.
- Dents: Heavy furniture or sharp items can create depressions in the flooring.
- Chipping: Dropping heavy objects can chip away small pieces from the edges of tiles or planks.
- Fading: Prolonged exposure to sunlight can cause areas of the vinyl to appear washed out.
While vinyl flooring is durable, it’s important to be mindful of potential damage, such as scratches, dents, and water-related issues. With proper care and maintenance, these problems can be minimized to extend the floor’s lifespan.
Preventing Future Damage on Vinyl Flooring
Preventing future damage to vinyl flooring is essential for maintaining its appearance and longevity. By taking a few proactive steps, you can protect your floor from common wear and tear, keeping it in top condition. Here are some key tips to help you prevent damage to your vinyl flooring.
- Use Furniture Pads
Heavy furniture can cause dents and scratches in vinyl flooring over time. To prevent this, place felt or rubber pads under the legs of furniture. This simple step will help reduce pressure and friction when moving furniture and prevent unnecessary damage.
- Place Rugs in High-Traffic Areas
High-traffic areas like hallways, entryways, and kitchens can experience more wear and tear. Use area rugs or mats in these spaces to protect the vinyl from scratches, scuffs, and dirt. Make sure the rugs have a non-slip backing to prevent slipping and sliding.
- Sweep and Mop Regularly
Dirt, dust, and small debris can cause micro-scratches on vinyl flooring over time. Regularly sweeping and damp mopping your floor will keep it clean and prevent abrasive particles from causing damage. Be sure to use a soft-bristle broom and a vinyl-safe cleaner to avoid harming the surface.
- Avoid Dragging Heavy Items
Dragging heavy objects, like furniture or appliances, across vinyl floors can cause deep scratches or tears. Always lift heavy items instead of dragging them, or use furniture sliders to minimize the risk of damage. This will prevent gouges that may require extensive repairs.
- Control Indoor Humidity
Excessive moisture or humidity can cause vinyl flooring to expand or warp, leading to potential damage. Use a dehumidifier in areas prone to high humidity, like basements or bathrooms, to maintain a stable environment. This will help protect the integrity of the floor.
- Use Appropriate Cleaning Products
Harsh chemicals or abrasive cleaners can damage the finish of vinyl flooring, making it more susceptible to scratches and stains. Always use cleaning products that are specifically designed for vinyl floors. Avoid bleach or ammonia-based products, as they can discolor and weaken the surface over time.
- Trim Pets’ Nails
Pets with long or sharp nails can scratch the surface of vinyl floors. To prevent this, regularly trim your pets’ nails or consider using pet-friendly floor mats in areas where they spend the most time. This will help minimize damage caused by their movements.
By following these simple preventative measures, you can protect your vinyl flooring from future damage and keep it looking great for years to come. Regular maintenance, along with thoughtful steps to minimize wear and tear, will help preserve the beauty and durability of your floors.
Considerations for Repairing Vinyl Flooring
When repairing vinyl flooring, it’s important to consider several factors to ensure a successful and durable fix. Understanding the specific needs of your flooring and the repair process will help you achieve a seamless result that restores both functionality and aesthetics. Below are some key considerations to keep in mind.
- Type of Damage: Assessing the specific type of damage is crucial, as different issues may require varying repair techniques and materials.
- Flooring Material: Identifying whether your vinyl is in sheets, tiles, or planks will influence the repair process and the materials needed.
- Color Matching: Ensuring a proper color match with your existing flooring is essential for achieving a seamless repair that blends well.
- Tools and Materials: Gathering the necessary tools and materials before starting the repair will help ensure a smoother and more efficient process.
- Subfloor Condition: Checking the condition of the subfloor beneath the vinyl is important, as any issues there could affect the durability and effectiveness of the repair.
- Moisture Issues: Addressing any underlying moisture problems is crucial, as these can lead to further damage or recurring issues after repair.
- Professional Help: Considering hiring a professional may be beneficial if the damage is extensive or if you’re unsure about performing the repair yourself.
- Preventative Measures: After repairing the flooring, implementing preventative measures will help maintain the integrity and appearance of the vinyl in the long term.
By addressing these factors, you can ensure a durable and visually appealing repair that maintains the integrity and appearance of your floor for years to come.
Additional Tips on Repairing Vinyl Flooring
When repairing vinyl flooring, a few extra tips can make the process smoother and more effective. These additional insights will help you achieve a professional-looking repair and extend the lifespan of your vinyl flooring. Here are some helpful tips to keep in mind.
- Use a Gentle Cleaner: Always clean the area with a gentle vinyl-specific cleaner before starting any repair to ensure the surface is free of dirt and debris.
- Test Adhesive: If using adhesive for repairs, test it on a small, inconspicuous area first to ensure compatibility with your vinyl flooring.
- Allow Adequate Drying Time: Follow the manufacturer’s recommendations for drying times to ensure a secure bond during repairs.
- Keep Foot Traffic Light: After making repairs, limit foot traffic in the area for at least 24 hours to allow the adhesive to set properly.
- Store Extra Material: If you have leftover vinyl from the original installation, store it in a safe place for future repairs or touch-ups.
By incorporating these additional tips, you can make your vinyl flooring repairs more effective and long-lasting.
Summary
This article serves as a comprehensive guide to understanding, repairing, and maintaining vinyl flooring, starting with an overview of the common types available and their unique characteristics. It discusses effective repair techniques for damage like scratches, dents, and tears, while providing tips to enhance the repair process.
Additionally, the guide emphasizes preventive measures, such as using furniture pads, placing rugs in high-traffic areas, and choosing suitable cleaning products to protect vinyl flooring from future damage. By following these recommendations, readers can ensure their vinyl flooring remains durable and visually appealing for years to come.


